[AutoML] PyCaret 현 시점 가장 완벽한 AutoML 라이브러리
오픈소스 Low-Code 파이썬 머신러닝 라이브러리

PyCaret은 scikit-learn , XGBoost , Microsoft LightGBM , spaCy 등과 같은 여러 머신러닝 라이브러리 및 프레임워크를 포함한 Python wrapper 이다. 현재 최신버전은 2.1이고, 공식 깃헙에서 Stars 개수가 2.4k를 기록하고 있다. 코드는 2019년에 2.0 버전부터 오픈한 것으로 보인다. 개발 디펜던시를 보면 왠만한 파이썬 기반 머신러닝 라이브러리는 다 건드리고 있다. 현 시점에서 가장 AutoML을 잘 구현한 라이브러리인 듯 하다. 심지어 Tensorflow까지 포함시키려고 준비중인 것으로 보인다. 어떻게 딥러닝 워크플로우를 통합할지 기대된다.
공식 홈페이지 튜토리얼도 초보자/중급자별, 모델별로 잘 만들어져 있어서 사용자가 쉽게 머신러닝에 접근할 수 있도록 했다. 굉장히 직관적인 함수 이름으로 모델 생성이 가능하다. 예를 들면 create_model()로 모델 객체를 생성하고, compare_models()로 여러 모델의 성능을 비교한다. tune_model(), ensemble_model(), plot_model() 함수로 파라미터 튜닝과 시각화를 할 수 있다. SHAP 기반의 모델 해석 기능인 interpret_model()도 제공한다. (이쯤되면 그냥 안되는게 없다고 보면 될듯..) 그리고 이렇게만 놓고 봐도 이것이 바로 AutoML 이다인데, automl()이라는 함수도 또 있다. 또(!) MLOps로 유명한 MLFlow도 바로 사용 가능하다😲
PyCaret은 머신러닝 전문가와 비전문가 모두에게 유용하다. PyCaret과 유사한 라이브러리는 있어도, PyCaret를 대체할 라이브러리는 나오지 않을 것 같다. (기존의 AutoML 라이브러리라고 해서 사용되는 라이브러리들은 사실 전체 ML 프로세스의 한 부분을 담당하고 있을 뿐이었다.) PyCaret이 버전을 올리면서 점점 기존의 머신러닝/딥러닝 라이브러리를 포함시켜준다면 지금보다 더 유명해지고 마치 scikit-learn이 그랬던 것과 같이 기본값으로 사용될 확률이 높다. (이미 PyCaret이 scikit-learn 기능을 포함하고 있고, scikit-learn의 사용성을 높였기 때문에 당연히 그럴 것이다.)
아래는 여기에서 기본적인 지도학습 튜토리얼을 옮겨온 것이다.
0. 설치
pip install pycaret
🍊 Step-by-Step Tutorial 오리지널 포스팅 주소
1. Getting Data
In this step-by-step tutorial, we will use ‘diabetes’ dataset and the goal is to predict patient outcome (binary 1 or 0) based on several factors such as Blood Pressure, Insulin Level, Age etc. The dataset is available on PyCaret’s github repository. Easiest way to import dataset directly from repository is by using get_data function from pycaret.datasets modules.
from pycaret.datasets import get_data
diabetes = get_data('diabetes')
2. Setting up Environment
The first step of any machine learning experiment in PyCaret is setting up the environment by importing the required module and initializing setup( ). The module used in this example is pycaret.classification.
Once the module is imported, setup() is initialized by defining the dataframe (‘diabetes’) and the target variable (‘Class variable’).
from pycaret.classification import *
exp1 = setup(diabetes, target = 'Class variable')
All the preprocessing steps are applied within setup(). With over 20 features to prepare data for machine learning, PyCaret creates a transformation pipeline based on the parameters defined in setup function. It automatically orchestrates all dependencies in a pipeline so that you don’t have to manually manage the sequential execution of transformations on test or unseen dataset. PyCaret’s pipeline can easily be transferred across environments to run at scale or be deployed in production with ease. Below are preprocessing features available in PyCaret as of its first release.
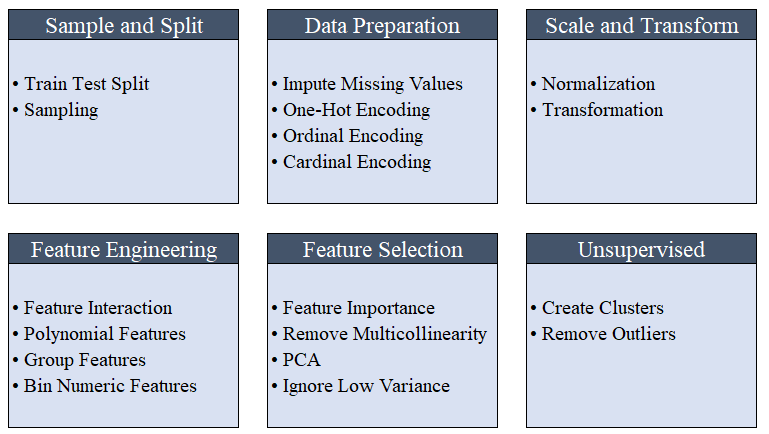 Preprocessing capabilities of PyCaret
💡 Data Preprocessing steps that are compulsory(필수적인) for machine learning such as missing values imputation, categorical variable encoding, label encoding (converting yes or no into 1 or 0), and train-test-split are automatically performed when setup() is initialized. Click here to learn more about PyCaret’s preprocessing abilities.
3. Compare Models
This is the first step recommended in supervised machine learning experiments (classification or regression). This function trains all the models in the model library and compares the common evaluation metrics using k-fold cross validation (by default 10 folds). The evaluation metrics used are:
- For Classification: Accuracy, AUC, Recall, Precision, F1, Kappa
- For Regression: MAE, MSE, RMSE, R2, RMSLE, MAPE
compare_models()
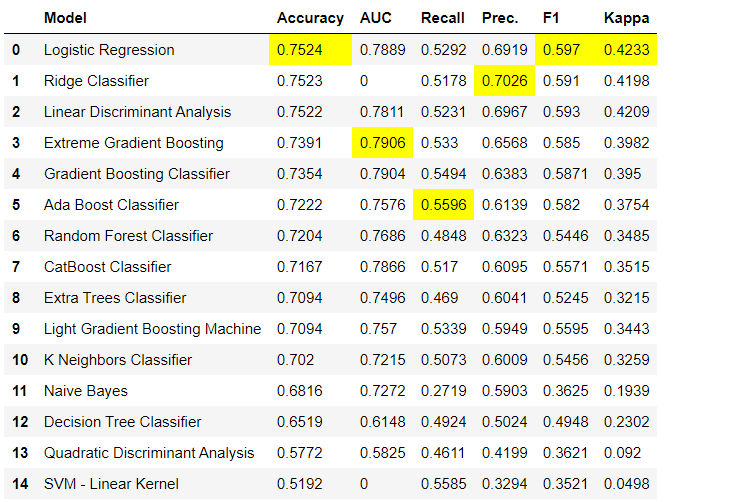 Output from compare_models( ) function
💡 Metrics are evaluated using 10-fold cross validation by default. It can be changed by changing the value of fold parameter.
💡 Table is sorted by ‘Accuracy’ (Highest to Lowest) value by default. It can be changed by changing the value of sort parameter.
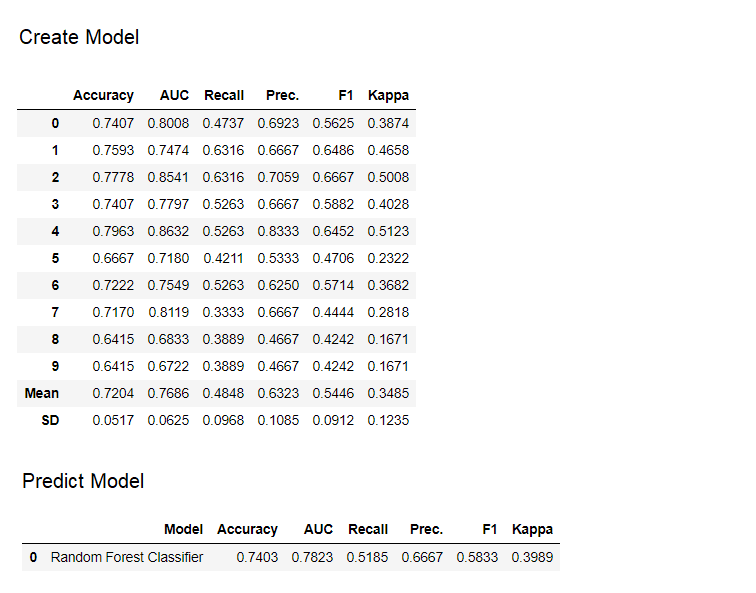
4. Create Model
Creating a model in any module of PyCaret is as simple as writing create_model. It takes only one parameter i.e. the model name passed as string input. This function returns a table with k-fold cross validated scores and a trained model object.
adaboost = create_model('ada')
Variable ‘adaboost’ stores a trained model object returned by create_model function is a scikit-learn estimator. Original attributes of a trained object can be accessed by using period ( . ) after variable. See example below.
adaboost.base_estimator_
adaboost.feature_importances_
💡 PyCaret has over 60 open source ready-to-use algorithms. Click here to see a complete list of estimators / models available in PyCaret.
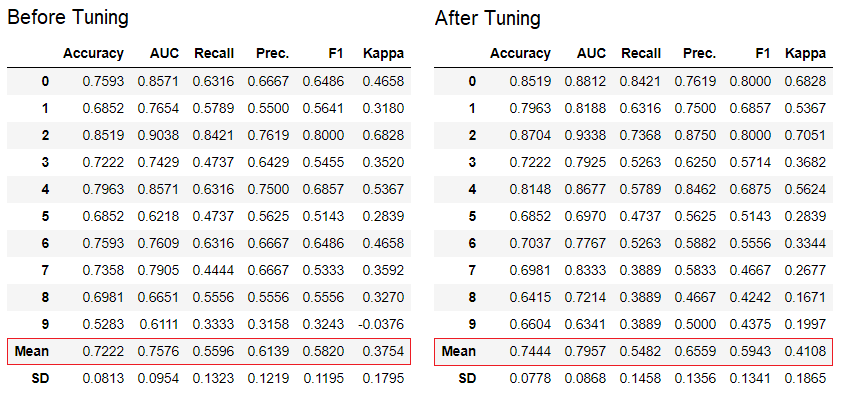
5. Tune Model
The tune_model function is used for automatically tuning hyperparameters of a machine learning model. PyCaret uses random grid search over a predefined search space. This function returns a table with k-fold cross validated scores and a trained model object.
tuned_adaboost = tune_model('ada')
💡 The tune_model function in unsupervised modules such as pycaret.nlp, pycaret.clustering and pycaret.anomaly can be used in conjunction with supervised modules. For example, PyCaret’s NLP module can be used to tune number of topics parameter by evaluating an objective / cost function from a supervised ML model such as ‘Accuracy’ or ‘R2’.
6. Ensemble Model
The ensemble_model function is used for ensembling trained models. It takes only one parameter i.e. a trained model object. This functions returns a table with k-fold cross validated scores and a trained model object.
# creating a decision tree model
dt = create_model('dt')
# ensembling a trained dt model
dt_bagged = ensemble_model(dt)
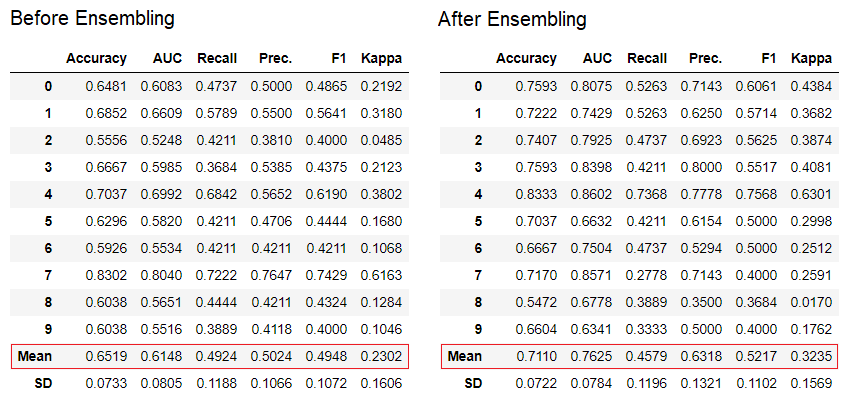
💡 ‘Bagging’ method is used for ensembling by default which can be changed to ‘Boosting’ by using the method parameter within the ensemble_model function.
💡 PyCaret also provide blend_models and stack_models functionality to ensemble multiple trained models.
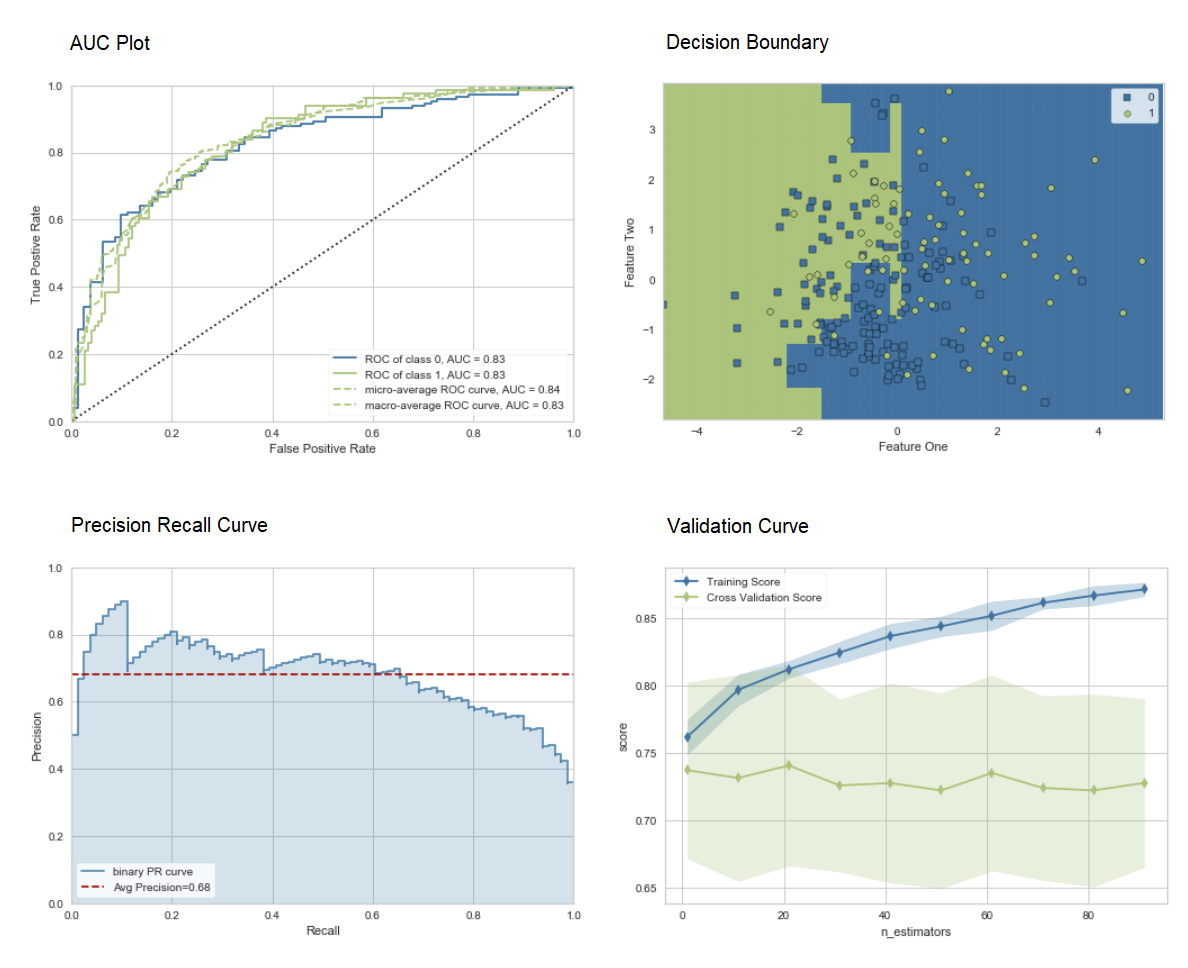
7. Plot Model
Performance evaluation and diagnostics of a trained machine learning model can be done using the plot_model function. It takes a trained model object and the type of plot as a string input within the plot_model function.
# create a model
adaboost = create_model('ada')
# AUC plot
plot_model(adaboost, plot = 'auc')
# Decision Boundary
plot_model(adaboost, plot = 'boundary')
# Precision Recall Curve
plot_model(adaboost, plot = 'pr')
# Validation Curve
plot_model(adaboost, plot = 'vc')
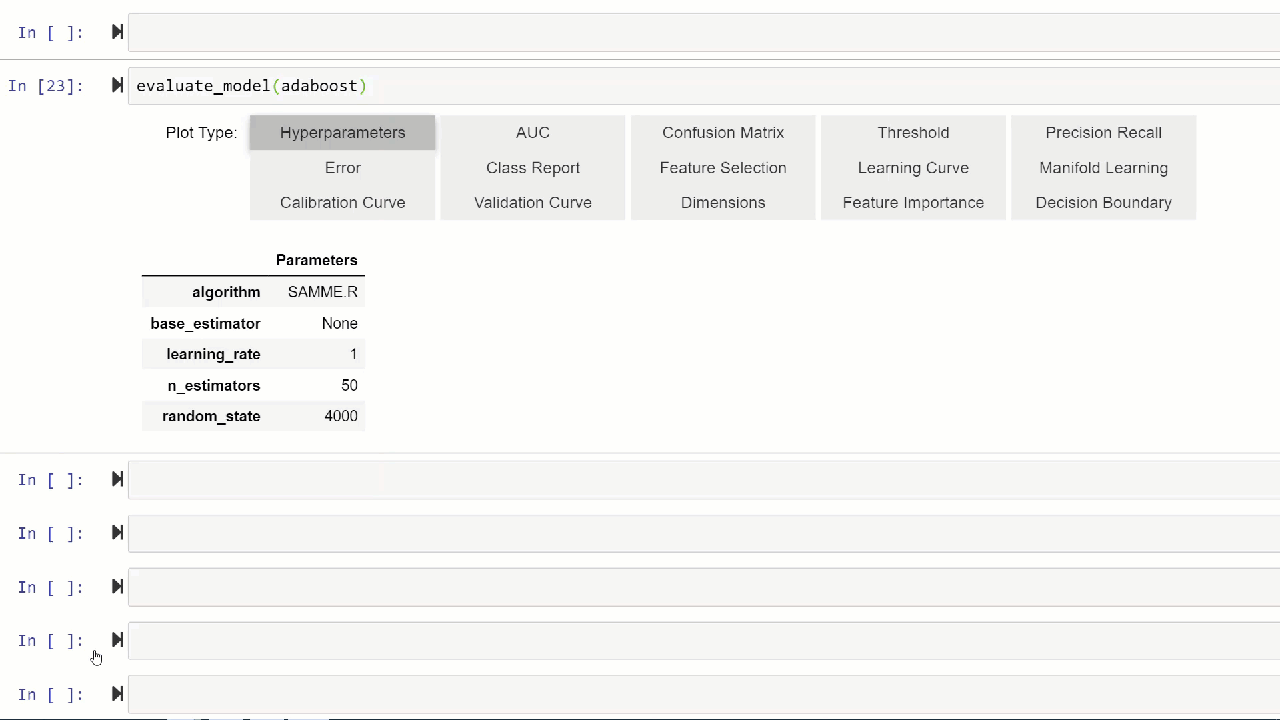
Click here to learn more about different visualization in PyCaret.
Alternatively, you can use evaluate_model function to see plots via user interface within notebook.
evaluate_model(adaboost)
💡 plot_model function in pycaret.nlp module can be used to visualize text corpus and semantic topic models. Click here to learn more about it.
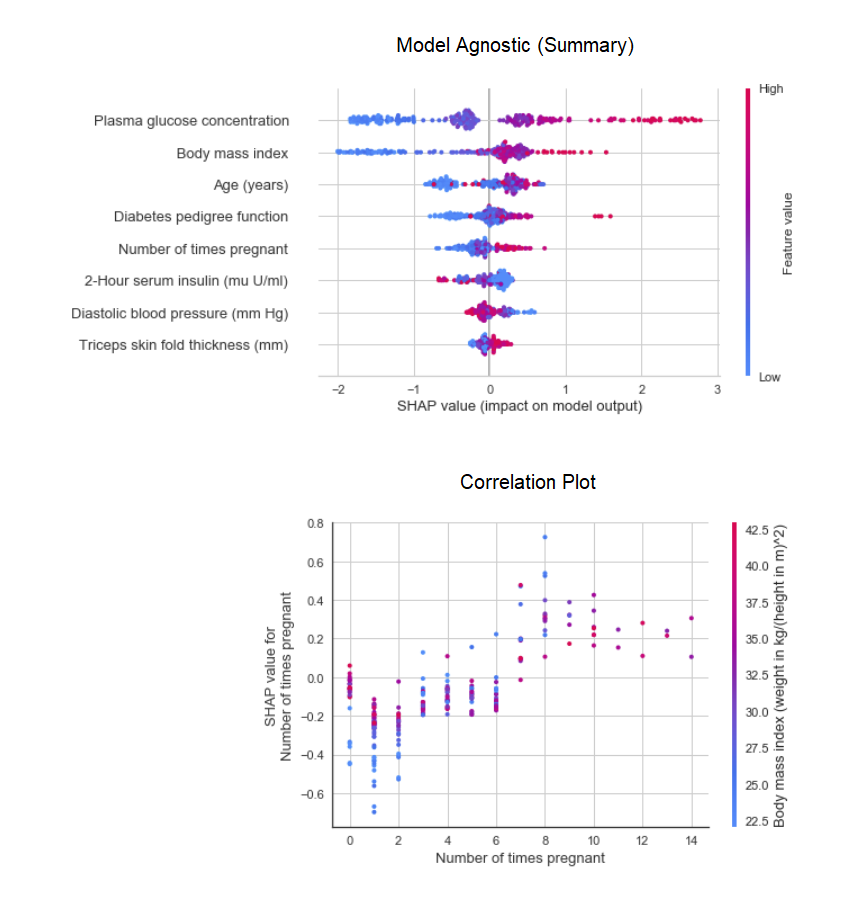
8. Interpret Model
When the relationship in data is non-linear which is often the case in real life we invariably see tree-based models doing much better than simple gaussian models. However, this comes at the cost of losing interpretability as tree-based models do not provide simple coefficients like linear models. PyCaret implements SHAP (SHapley Additive exPlanations) using interpret_model function.
# create a model
xgboost = create_model('xgboost')
# summary plot
interpret_model(xgboost)
# correlation plot
interpret_model(xgboost, plot = 'correlation')
Interpretation of a particular datapoint (also known as reason argument) in the test dataset can be evaluated using ‘reason’ plot. In the below example we are checking the first instance in our test dataset.
interpret_model(xgboost, plot = 'reason', observation = 0)

9. Predict Model
So far the results we have seen are based on k-fold cross validation on training dataset only (70% by default). In order to see the predictions and performance of the model on the test / hold-out dataset, the predict_model function is used.
# create a model
rf = create_model('rf')
# predict test / hold-out dataset
rf_holdout_pred = predict_model(rf)
predict_model function is also used to predict unseen dataset. For now, we will use the same dataset we have used for training as a proxy for new unseen dataset. In practice, predict_model function would be used iteratively, every time with a new unseen dataset.
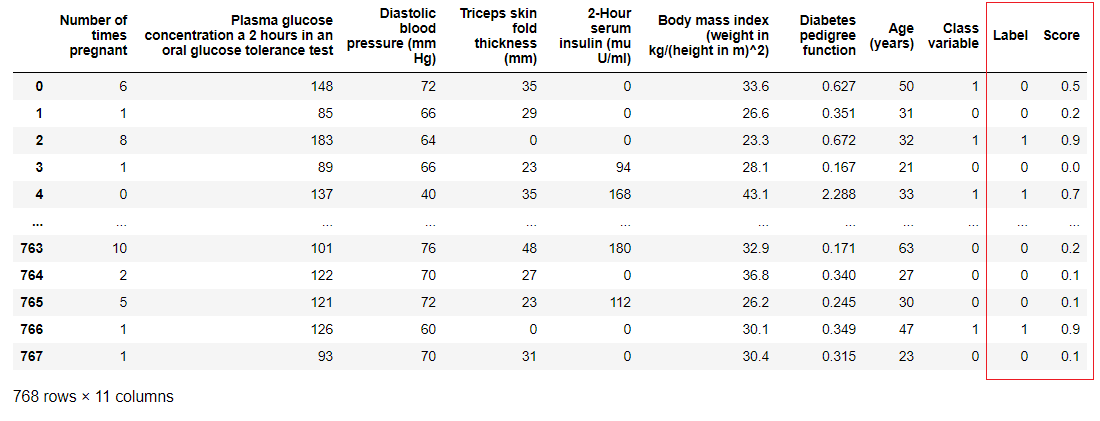
predictions = predict_model(rf, data = diabetes)
💡 predict_model function can also predict a sequential chain of models which are created using stack_models and create_stacknet function.
💡 predict_model function can also predict directly from the model hosted on AWS S3 using deploy_model function.
10. Deploy Model
One way to utilize the trained models to generate predictions on an unseen dataset is by using the predict_model function in the same notebooks / IDE in which model was trained. However, making the prediction on an unseen dataset is an iterative process; depending on the use-case, the frequency of making predictions could be from real time predictions to batch predictions. PyCaret’s deploy_model function allows deploying the entire pipeline including trained model on cloud from notebook environment.
deploy_model(model = rf,
            model_name = 'rf_aws',
            platform = 'aws',
            authentication =  {'bucket':'pycaret-test'})
11. Save Model / Save Experiment
Once training is completed the entire pipeline containing all preprocessing transformations and trained model object can be saved as a binary pickle file.
# creating model
adaboost = create_model('ada')
# saving model
save_model(adaboost, model_name = 'ada_for_deployment')
You can also save the entire experiment consisting of all intermediary outputs as one binary file.
save_experiment(experiment_name = 'my_first_experiment')
💡 You can load saved model and saved experiment using load_model and load_experiment function available in all modules of PyCaret